Difference between revisions of "Bartoli's Hideout"
From WikiRaider
m (formatted according to the sample levels page, added {{perfectname}}) |
|||
| (17 intermediate revisions by 4 users not shown) | |||
| Line 1: | Line 1: | ||
| − | '''Bartoli's Hideout''' is the third | + | {{perfectname}} |
| + | {{Infobox Level | ||
| + | | Name = Bartoli's Hideout | ||
| + | | Image = Hideout.jpg | ||
| + | | Game = Tomb Raider II | ||
| + | | Section = [[Venice Section]] | ||
| + | | Levelno = 3 | ||
| + | | Length = 1 | ||
| + | | Gametime = 35 minutes | ||
| + | | Timetrial = | ||
| + | | Firsttime = | ||
| + | | Secrets = 3 | ||
| + | | Special = | ||
| + | | Location = [[Europe]], [[Italy]], [[Venice]] | ||
| + | | Chrono = 1 | ||
| + | | Previous = Venice | ||
| + | | Next = Opera House | ||
| + | | Adjacent = | ||
| + | | Wtlink = tr2/bartoli | ||
| + | }} | ||
| + | '''Bartoli's Hideout''' is the third level in [[Tomb Raider II]]. | ||
| + | Location of the level is [[Marco Bartoli]]'s hideout in [[Venice (location)|Venice]]. | ||
| − | + | ==Story== | |
| + | {{mainarticle|Tomb Raider II Story}} | ||
| + | Lara continues her search for a man named [[Bartoli]] in [[Venice (location)|Venice]]. | ||
| + | ==Objectives== | ||
| + | * Get inside [[Bartoli]]'s villa | ||
| + | * Find the [[Library Key]] in the ballroom | ||
| + | * Find the entrance to the library | ||
| + | * Find the [[Detonator Key]] | ||
| + | * Use the [[Detonator Key]] to detonate a bomb with enables the access to the [[Opera House]] | ||
| − | + | ==Finds== | |
| + | ===Secrets=== | ||
| + | In this level you can find 3 stone dragons. | ||
| + | * [[Silver Dragon]] | ||
| + | <!-- : description text --> | ||
| + | * [[Golden Dragon]] | ||
| + | <!-- : description text --> | ||
| + | * [[Jade Dragon]] | ||
| + | <!-- : description text --> | ||
| − | + | ===Artefacts & Keys=== | |
| + | * [[Library Key]] | ||
| + | * [[Detonator Key]] | ||
| − | + | ===Supplies=== | |
| − | [ | + | ====Weapons==== |
| + | * [[Automatic Pistols]] (if not obtained earlier) | ||
| + | * [[Uzis]] | ||
| − | <br clear="all">[[Category:Levels]] | + | ====Goodies==== |
| + | =====First Aid===== | ||
| + | * [[Large Medipack]] | ||
| + | * [[Small Medipack]] | ||
| + | |||
| + | =====Ammo===== | ||
| + | * [[Automatic Pistol Clips]] | ||
| + | * [[Uzi Clips]] | ||
| + | * [[Shotgun Shells]] | ||
| + | |||
| + | =====More Gear===== | ||
| + | * [[Flares]] | ||
| + | |||
| + | ==Enemies== | ||
| + | * [[Rats]] | ||
| + | * [[Dobermann]]s | ||
| + | * [[Fiamma Nera Brawlers]] | ||
| + | * [[Fiamma Nera Killers (Automatic)|Fiamma Nera Killers]] | ||
| + | |||
| + | ==Traps & Obstacles== | ||
| + | ===Traps=== | ||
| + | * [[Burners]] | ||
| + | * [[Statues with Knife Blade]] | ||
| + | * [[Wall-mounted Knife Blades]] | ||
| + | |||
| + | ===Obstacles, Triggers & Puzzles=== | ||
| + | * [[Breakable Window]] | ||
| + | * [[Water]] | ||
| + | * [[Movable Block]] | ||
| + | |||
| + | ==Typical Scenery of the Level== | ||
| + | <gallery> | ||
| + | Image:Hideout01.jpg|Canals | ||
| + | Image:Bartolishideout tr2.jpg|Library overlooking the garden | ||
| + | </gallery> | ||
| + | |||
| + | <br clear="all" /> | ||
| + | [[Category:Levels]] | ||
| + | [[Category:Tomb Raider II]] | ||
| + | |||
| + | |||
| + | [[de:Bartolis Versteck]] | ||
Latest revision as of 16:51, 26 December 2014
| Bartoli's Hideout | |||
|---|---|---|---|

| |||
| Tomb Raider II | |||
| Section | Venice Section | ||
| Level No | 3 | ||
| Length (*) |
| ||
| Secrets | 3 | ||
| Location | Europe, Italy, Venice | ||
| Level Chronology: | |||
| Venice | Bartoli's Hideout | Opera House | |
Bartoli's Hideout is the third level in Tomb Raider II.
Location of the level is Marco Bartoli's hideout in Venice.
Contents
Story
- Main article: Tomb Raider II Story
Lara continues her search for a man named Bartoli in Venice.
Objectives
- Get inside Bartoli's villa
- Find the Library Key in the ballroom
- Find the entrance to the library
- Find the Detonator Key
- Use the Detonator Key to detonate a bomb with enables the access to the Opera House
Finds
Secrets
In this level you can find 3 stone dragons.
Artefacts & Keys
Supplies
Weapons
- Automatic Pistols (if not obtained earlier)
- Uzis
Goodies
First Aid
Ammo
More Gear
Enemies
Traps & Obstacles
Traps
Obstacles, Triggers & Puzzles
Typical Scenery of the Level
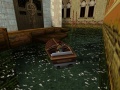
Canals
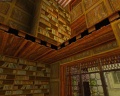
Library overlooking the garden

